Reese’s Cup Brownies

I was really struggling to come up with an idea for this blog. I wanted to make all of my recipes from scratch to show college students they can make quick desserts without using a lot of pre-packaged ingredients. Because I was having trouble finding a simple recipe in my own recipe arsenal,  I went to Pinterest. Even then, I was still contemplating what recipe I wanted to write about because most of the Pinterest recipes were made from a box mix.  I finally gave in and picked a brownie recipe from a box.

I got this Reese’s Cup Brownie recipe from Key Ingredients. This recipe was created by Christen F. She actually made homemade browines, but college students don’t usually have  items like baking powder and soda, so I just used a box mix.

The ingredients that you will need to make these brownies:                                                                                               The ingredients you will need
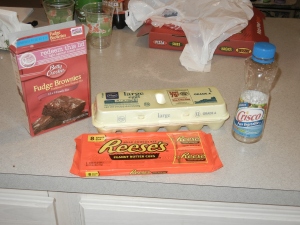
  • 1 Brownie Mix
  • ¼ cup water
  • 2/3 cup of vegetable oil
  • 2 Eggs
  • 8 Reese’s Cups

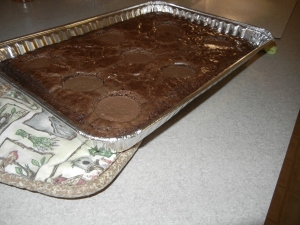
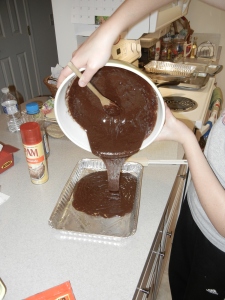
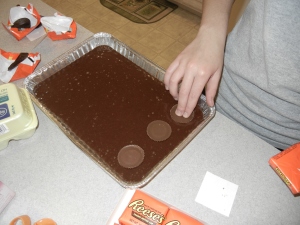
This recipe is really easy to make. First you make the brownie batter according to the box. Then you pour the batter into a 13 X 9 brownie pan. Place the Reese’s Cups into any pattern in the batter and bake. You will bake the brownies according to the box. I used Betty Crocker brownies, and it said to bake the brownies at 350 degrees for 24-30 minutes.

Poor Batter into baking sheet          Place Reese's Cups into the batter                  The finishes product

Reese’s cups aren’t the only sweets that you could put into brownies. You can add your favorite candy bar. Another brownie recipe from Key Ingredients is Chocolate Chunk Brownies. These brownies have chunks of chocolates bars in them.

For a holiday brownies, I found a recipe from The Daily Meal. All you do is add mint chocolate chips into the brownie batter then put peppermints or broken pieces of candy canes in the top.

My roommate, she makes brownies and puts Oreos into the batter. When you bite into the brownies, the Oreos are not crunchy, they are soft. With all of the different flavors of cream and different cookie combinations, you would never run out of flavor ideas.

My favorite type of brownie is cream cheese brownies. To make these brownies all you do is mix a package of cream cheese, one egg and a cup of sugar. You pour the cream cheese on top of the brownies and bake then as directed.

Another type of brownie that many people have never heard of is blonde brownies. In blonde brownies you don’t put any coco powder in them. You also add brown sugar in them, so they taste like brown sugar not chocolate.

Most of these brownies can be made with a boxed brownies mix except for the blonde brownies. Using a boxed mix makes all of these recipes easy to make and inexpensive as well. Using a box brownie mix is perfect for college students because there is no measuring dry ingredients. All you do is add the wet and bake.
Energy Drinks Change Product Category To Aviod FDA Regulations

Taking a break from my normal posts for another week, I thought I would discuss a case of bad PR in the food and beverage industry.

The makers of extra-caffeinated energy drinks like Monster, Rock Star and 5-Hour Energy are having a tough time. After being tied to several deaths and suffering through a few rounds of terrible PR, they’ve decided to  shift their strategies by dropping the “dietary supplements” category and referring to their products by their proper name: beverages. A question brought up by this change is: how did they get away with this for so long?

In calling their products what they so obviously are, the makers of these drinks are also subjecting themselves to new regulations and avoiding others. They now have to list exactly how much caffeine each can contains, but their spokespeople no longer have to let the FDA know when someone draws a link between the “beverages” and their adverse health effects.

Of course, nothing about the contents of these cans will change.

The drink companies have also begun pushing back aggressively against the highly publicized cases of teenagers who supposedly died after consuming their products by calling press conferences and hiring their own teams of physicians to dispute previous findings (not that their paid-for testimony will be “biased” or anything).  Monster has recently threatened to sue a childhood nutrition specialist after her newsletter for children stated that kids shouldn’t consume caffeinated energy drinks and the article didn’t even mention any brands by name.

This is a bad PR case because these companies know that their product killed these children and they are fighting back in any way they can. Trying to sue anyone who states that energy drinks are bad screams “we know our product is harmful we just want to make money.” This is a great example of bad PR because these beverage companies just changed this product category this month. It really shows what a company will do just to keep its product on the market.

Watch this newscast on the issue of energy drinks causeing health problems.

http://www.youtube.com/watch?v=fanRfmlhUSg

KitchenAid’s Partnership with Susan G. Komen

Since 2001, Cook for the Cure, presented by KitchenAid has raised more than $8 million for Susan G. Komen for the Cure through donation-with-purchase programs, special fundraising events, auctions, grassroots initiatives, and involvement from famous chefs. During 2012, KitchenAid was proud to donate a minimum of $450,000 to Susan G. Komen for the Cure in conjunction with its pink product collection.

KitchenAid 1,000 Cooks for the Cure July 20-29, 2012  Cook for the Cure turned up the heat on its successful party fundraising efforts through its initiative called 1,000 Cooks for the Cure. From July 20-29, Susan G. Komen Affiliates, breast cancer survivors, celebrity chefs and all those engaged in the fight against breast cancer were asked to turn on the oven and turn up the party music – all for a great cause. The goal was to sign up 1,000 cooks across the country to join together, share good times, enjoy great food and raise funds for Susan G. Komen for the Cure. The program was open to anyone, and any event that involves food is an acceptable party – from an office luncheon or Friday night cocktail party to a Saturday afternoon neighborhood cookout or Sunday potluck. Whatever fit best into the host’s food-loving lifestyle was fair game. What made this party special was that instead of flowers or other gifts, cooks encouraged their guests to bring their checkbooks and make a donation to Susan G. Komen for the Cure. Hosts registered their parties at KitchenAids website, where they received a unique cook ID number. Registered hosts with an ID number then had access to a party kit from KitchenAid that included party hosting ideas, recipes and donation form. KitchenAid also hosted an event on its Facebook page and communicated with hosts via Twitter @KitchenAidUSA in the days leading up to the event. After the event was complete, those hosts who raised at least $50 in donations at their 1,000 Cooks for the Cure party received a freeSusan G. Koman fundrasing magnet Pass the Plate serving platter from KitchenAid as a thank you gift.

Pass the Plate Pass the Plate allows cooks to raise funds for Susan G. Komen for the Cure by sharing their favorite culinary creations with friends or family via a specially designed Villeroy & Boch serving plate. When the plate is purchased and also passed, the giver is asked to visit the Pass the Plate website to share a few words about what they “passed” and enter the number stamped on the back of the plate. From this website participants can follow their plate’s travels. Every time the plate is passed and registered, KitchenAid will donate $5 to Komen for the Cure.

Cook for the Cure Pink Collection KitchenAid® countertop appliances from the pink product collection are available at www.CookfortheCure.com, www.ShopKitchenAid.com and retailers nationwide. The collection includes the popular Artisan Stand Mixer, 12-Cup Food Processor and 5-Speed Blender. For more information can be found on www.CookfortheCure.com.

KitchenAid’s corporate sponsorship and community relations practices have proven to be a successful. It used a best practice of partnering with a well know organization to raise a lot of money for a good cause.

Dirt Pudding

Let’s face it. We all maybe sophisticated young professionals, but sometimes we just feel like being a kid. Growing up my cousins were addicted to chocolate, and all they ate was Dirt Pudding. We ate it for every family gathering. On Thanksgiving, to celebrate me and my cousin’s birthday, my aunt would draw a basketball court on top of the Dirt Pudding and make half of the court green for my school and the other half blue for my cousin’s school.

Dirt Pudding lets every adult be a child again. Every time you make it, it can take you back to your childhood just like it takes me back to my birthdays as a child.

I don’t have a recipe for Dirt Pudding, but I knew I wanted to blog about it, so I look it up on Pinterest and found a lot of recipes for it. There are many ways to make Dirt Pudding, but I found one that looks just like what my aunt made. This recipe is from the blog frugal-franny.blogspot.com.

Ingredients:

  • 14oz bag Oreos
  • 2-3.5oz pkgs chocolate instant pudding
  • 3 C milk
  • 1 C powdered sugar
  • 1-8oz pkg cream cheese, softened
  • 1/4 C butter, softened
  • 1-12oz tub cool whip

 Steps:

  1. break cookies into small pieces
  2. place 1/2 to 2/3 cookies on bottom of 3 qt casserole dish
  3. whisk pudding and milk together and set aside
  4. beat sugar, cream cheese and butter together in a separate bowl
  5. stir together the pudding and cream cheese mixture
  6. fold in cool whip
  7. pour over cookies
  8. top with remaining cookies
  9. refrigerate at least 60 minutes before serving


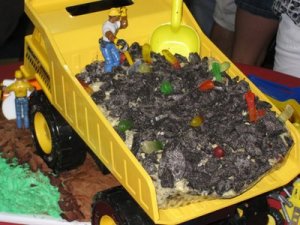
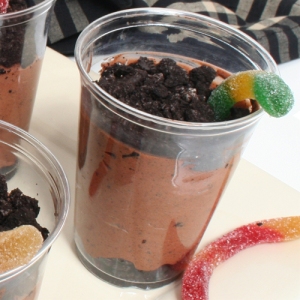
Having Dirt Pudding as my birthday cake for many years, my aunt got creative and presented it in many different ways. There were dirt-scapes in toy dump trucks, cups with gummy worms in it and even fake gardens with worms and flowers.

Dump truck Dirt PuddingThis dessert can bring-out any college student’s creative side for less. I bought all of the ingredients that I didn’t already have, at Giant Eagle for under $7. If you shop at a discount store than you could possibly get your bill under $5. 

This recipe requires no baking, so for Kent State University students who have refrigerators in their dorm rooms, they could make this recipe quickly and easily. I’m not saying that there won’t be a mess made because breaking up the Oreos isn’t a neat job. Cup of Dirt

 Alternatives to using Oreo cookies are chocolate-chip cookies, mint cookies, or any cookie that you like. This recipe is versatile and can be changed to your tastes. You can even change the flavor of the pudding from chocolate to vanilla.

I have found smaller versions of the recipe, the only problem is this recipe is from a bakery so you have to buy these smaller Dirt Puddings.  You can order a dozen for $20 at livelovebake.com.

I hope you enjoy this recipe as much as my chocoholic cousins do. If you would like to see any recipes on my blog please fill free to shoot me your ideas in the comment box.   


Cherry Pineapple Dump Cake

Since the beginning of the semester, I have been counting down the days until spring break. Now that it’s the end of February, spring break is less than 25 days away. To reflect my spring attitude, I though a fresh, fruity dessert was in order.

There are many fruit cakes, pies, crisps and crumbles, but they’re not simple to make. They are time consuming, and require ingredients that are more expensive than canned fruit.

A Cherry Pineapple Dump Cake is a fruit-filled cake that is a refreshing change from ordinary vanilla and chocolate recipes. The fruit in the cake spruces up an ordinary yellow cake into something made for spring. This dessert is colorful and cheery. It will brighten any ones dreary end-of-winter blues.

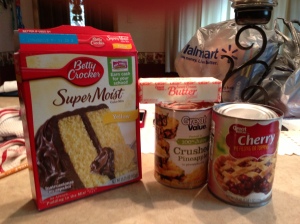
Other bloggers must have the same spring feeling as well because I found a recipe for just a Cherry Dump Cake that was featured on theblondecook.blogspot.com, which I found on Pinterest. I also found an Apple Dump Cake recipe on Pinterest that was featured on excellent-eats.com. Pinterest is a great way to find recipes that you are looking for, or just a resource to find new ones. There are also a lot of recipes that are good for college students because they’re smaller, Ingredents for Cherry Pineapple Dump Cakesimpler versions of the original. For example you can make by-the-apple-slice apple pies called Apple Pie Bites.

Dump cakes are good recipes for college students and baking new comers because they require few ingredients, and all you do is dump. For the Cherry Pineapple Dump Cake there are only four ingredients that you need:

·         1 yellow cake mix

·         1 can of cherry pie filling

·         1 can of crushed pineapple               

·         1 stick butter

The directions are simple. Dump the can of pineapple and cherry pie filling into a 13×9 baking pan. Then cover the fruit with the yellow cake mix. Finally cut the stick of butter into pieces to put on the top of the cake. Throw the cake into a 350 degree oven for 30 minutes.

Tips from the blogger

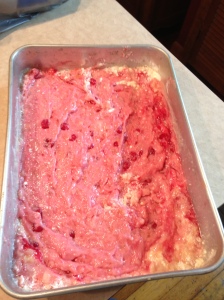
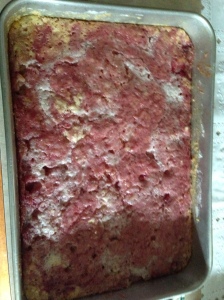
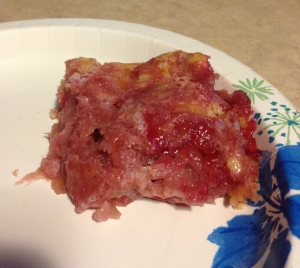
Make sure you put the fruit on the bottom of the pan. When I made it, I put the cake at the bottom and the fruit on the top. I realized this wasn’t right, so I mixed it together. That was a huge mistake. The cake did not turn out at all. It was more like Dump Cake Pudding. The cake mix did not set up because I mixed the liquid with the cake instead of letting the cake mix absorb the liquid while it cooked.

If you don’t want to make this dump cake with cherries and pineapple you can use any fruit that you want to.

To make sure you don’t make the same mistakes that I did, here is another blogger who blogged about Cherry Pineapple Dump Cake. Michelle, the owner of Michelle’s Tasty Creations, made this cake, and it turned out perfectly. She followed the directions unlike me.

For your amusement, I have posted the pictures of my messed up Cherry Pineapple Dump Cake.  


Not right cake batter.   Cake after baked. Did not turn out right..A slice of my pudding cake.


Strawberry Pretzel Dessert

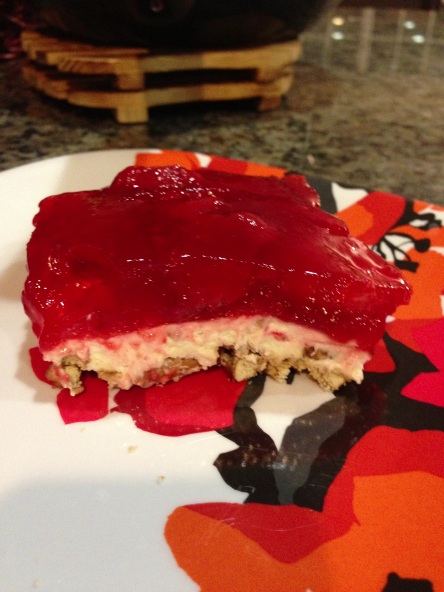
 Strawberry Pretzel  Dessert

Strawberry Pretzel Dessert is one of my family’s favorite desserts. We have it all the time at picnics in the summer. It is very light, refreshing and surprisingly good. People don’t expect the combination of strawberries, Jell-O, cream cheese and pretzels to be so good together. Once you have one piece, you will be hooked and will have to have more than one. When I made this recipe for my roommates they loved it. I also made it for my sister’s party, and people were raving about it. I don’t think anyone had just one piece; they had two or three pieces. This dessert is that good.

Strawberry Pretzel Dessert is a perfect recipe for a college students. It is cheap, easy and requires little baking. You can even make it in a dorm room. All you would have to do is find a stove to bake the crust, and the rest can be done away from a kitchen if you have a refrigerator in your dorm.

Here is how you make Strawberry Pretzel Dessert.

 Crust

·         1 ½ cups crushed pretzels

·         ½ cup sugar

·         1 stick butter

Pretzel Crust for dessert

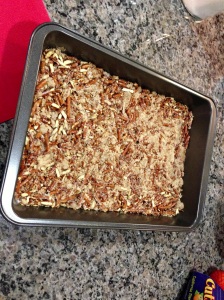
First you want to start off by making the crust. You want to crush enough pretzels to make 1 ½ cups. The best way to crush the pretzels is by food processor, but most college students don’t have one, so a Ziploc bag and a rolling pin or frying pan works good. All you will do is put the pretzels in the bag, and beat them until they are crushed.

Once the pretzels are crushed, dump them into a glass or metal 9×13 baking pan, and add ½ cup of sugar. Then take a stick of butter and melt it in the microwave. To best melt butter, put the microwave on defrost for about a minute or two. When it is melted pour it on top of the pretzels and sugar.  Stir until butter has coated the pretzels. Finally use a fork to even out pretzels in the pan and firmly pack it together.  

Bake pretzel crust in a 350 degree oven for 10 minutes.

 Cream Cheese Layer

·         1-8 ounce cream cheese

·         ½ cup sugar

·         4 ounces of Cool Whip

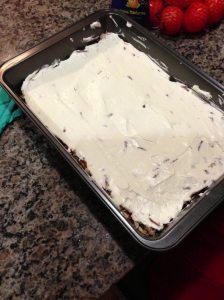
To make the cream cheese filling, you will put one 8 ounce package of room temperature cream cheese into a mixing bowl. Mix in ½ cups of sugar and 4 ounces of Cool Whip. That’s it. The cream cheese layer is done. It is that simple.


 Topping

·         6 ounce box of strawberry Jell-O

·         2- 16 ounce containers of frozen strawberries

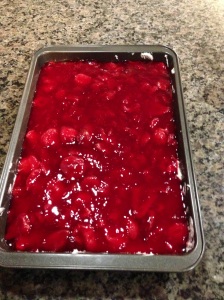
To make the strawberry topping, boil two cups of water. Once boiling, add to Jell-O powder to dissolve it. Once the Jell-O is dissolved, add the two 16 ounce containers of unfrozen strawberries to the Jell-O. Put mixture in the freezer, so it will set up faster. You don’t want it to set up all the way. You want it like a chunky liquid when you pour it onto the rest of the layers.

 Cream cheese layer

Combining all of the layers

Now that the crust is cool and the Jell-O is partially set up, it’s time to assemble the dessert. First spread the cream cheese mixture onto the top of the pretzel crust. Then pour your chunky, only partially set Jell-O, onto the top of the cream cheese layer. Lastly, put the pan into the refrigerator until Jell-O is completely firm.


Tips from the blogger

1.  Make sure you put enough butter in your crust or it will not get hard, and you will have a difficult time spreading on the cream cheese mixture because the crust will come up when you’re spreading.

2. Make sure you measure the liquid right for the Jell-O because it will not firm up well if it has too much liquid.

  1. 3. For best results, let dessert sit in the refrigerator over-night before you eat it because it is best when the pretzel crust has started to get soggy. Finished Dessert


I hope you enjoy this recipe as much as my family and I do. Once you make it, it will become one of your favorites. Just watch-out though. If other people besides you have access to your refrigerator, you will go to get a piece, and it will be gone because other people will have eaten all of it. I suggest you hide it, or eat it all gone really fast, so no one can steal your deliciousness.

Chocolate-Cinnamon Nachos

Chocolate-Cinnamon Nachos

Over Christmas break I watched the Food Network for hours and hours since I had nothing better to do during my time off from school. I watched my favorites: Giada at Home and the Barefoot Contessa. I also watched a new program called “$10 Dollar Meals.” This show is hosted by Melissa d’Arabian. In the program she cooks a protein, vegetable, carbohydrate and a dessert for under $10.

When I watch cooking shows I often feel compelled to print off the recipe and try making it myself, so I printed off the dessert that Melissa made when I was watching her show, and put it aside to make it sometime in the future when my sweet-tooth decided to flare up.

When I came up with the concept for this blog, I knew exactly what recipe I was going to do first because it is the cornerstone of easy, inexpensive and nearly effortless recipes. Chocolate-cinnamon nachos only takes six ingredients to make and under ten minutes to construct.

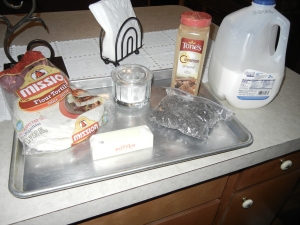
Ingredients you will need for this recipe:All the ingredents you will need for chocolate cinnamon nachos

  • ·         4 small flour tortillas
  • ·         2 tablespoons butter, melted
  • ·         ¼ cup plus 1 tablespoon cinnamon sugar
  • ·         ½ cup chocolate chips
  • ·         ¼ cup plus 2 tablespoons heavy cream

How to prepare this recipe

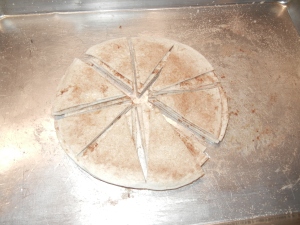
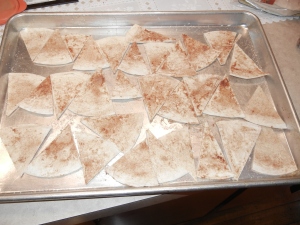
First preheat your oven to 450 degrees F. Then take your four tortillas and brush both sides of the tortillas with butter and sprinkle with the ¼ cup of cinnamon sugar. Cut each tortilla into eight wedges. Place the tortilla chips on a foil-covered baking sheet. Bake in oven until golden, turning halfway through, 4 to 5 minutes per side.

How to cut your torillas     Spread tortillas out evenly

Meanwhile, heat the chocolate chips with two tablespoons heavy cream in microwave until smooth and melted, stirring every 15 seconds. It should take about 45 seconds’ total. To learn how to melt chocolate, watch this short video at http://http://www.buzzle.com/articles/melting-chocolate-chips.html.

If you would like to make homemade whipping cream, in a small bowl, beat the remaining ¼ cup heavy cream to soft peaks. Soft peaks means there looks like there are little mountains of whip cream in the bowl.

If you don’t want to make your own whip cream, you can just buy a can of it.

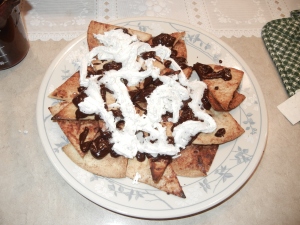
Once the chips are done, place them on a platter. Drizzle the chocolate sauce, and top with small spoonfuls of the whipped cream. Sprinkle with remaining tablespoon of cinnamon sugar and serve immediately.

Tips from the Blogger

  1. When baking the tortillas, bake them for less than the time says. I baked mine for four minutes per side and they came out burnt.
  2. Make sure you don’t put too much cream in your chocolate because if you do it will turn into hot chocolate not chocolate sauce.
  3. Don’t put the whip cream on the top while the chocolate is really hot because it will melt.
  4. This recipe only serves four people, so if you want to make it for a large crowd you might want to double or triple the recipe.


This recipe is the perfect recipe to fit the college lifestyle. It tastes good and it’s really easy. You will be able to fit preparing this recipe into your schedule, and still have plenty of time to do your homework. Plus this recipe is  easy to clean up because you don’t have to clean a baking dish.

Hope you enjoy.